Receive Artwork
We check artwork to make sure it is print ready. We advise if changes are required
Convert Artwork
If you cannot supply print ready artwork, we do convert it (after payment).
Send Proof
We send a PDF proof via Email for you to check. The email contains all specifications.
Production
On reply confirmation to the email, your order is placed for production.
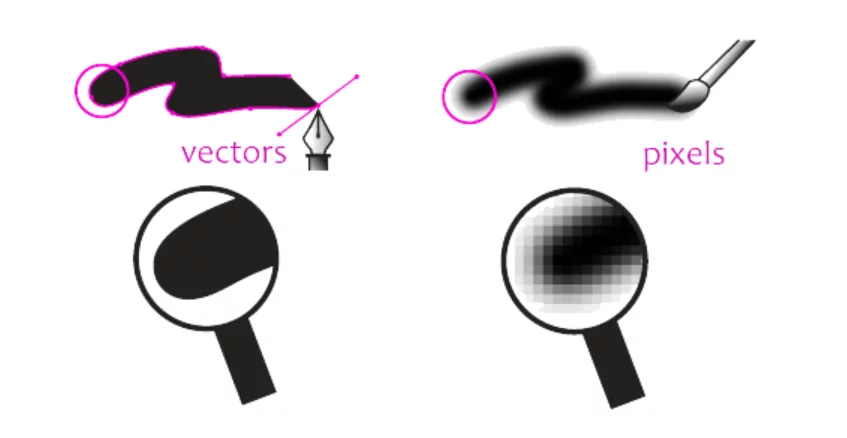
Vector Artwork
‘Vector’ artwork allows modifying of artwork without compromising it. It also allows scaling it without loss of quality.
Generally vector artwork is within .AI, .SVG, .EPS, .PDF files. however this does NOT mean that the artwork has been made in a vector format.
You can tell if a PDF document has vector artwork by zooming in 6,000%.
If it pixelates, it is NOT in a vector / editable format.
If it 'redraws' or consists of the same quality, the artwork has been made in a vector fomat.
PNG or JPG are Bitmap files (made from pixels) and are NOT vector / editable.
Photoshop cannot create vector artwork, Illustrator can.
If you do not have a vector version of your logo, check out our Logo Vector conversion service here
General
Your design may look great on screen, however there are important considerations to ensure a quality printed product. Checking your artwork is a good habit to get in to
before sending through to a printer. This can take a lot of stress of deadlines.
Although we pride ourselves on our prepress process, we need charge for our time if we need to fix your artwork. Ensuring the following checks are met can save you money!
- Artboard Size: MUST be the same as stated in the product information or provided quote.
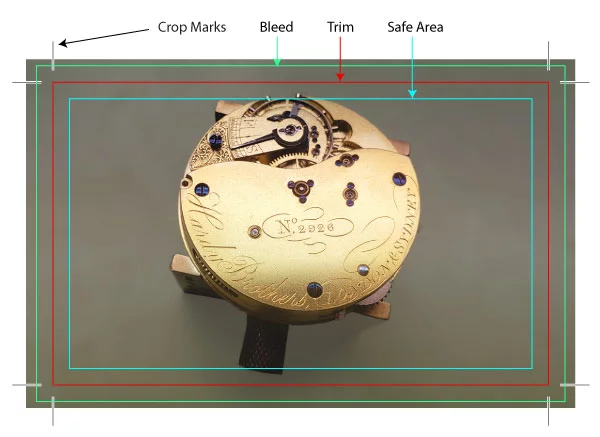
If the artwork is not the same size as the quoted product, it will take additional time before production can commence. If you have chosen to supply ‘print ready artwork’ and the size is not correct, additional cost may be incurred. TIP: your design software, make sure you have ‘rulers’ shown, and make sure the units are set to millimeters (NOT pixels). - Safe Area: all text and important art must be within the required space from the trim . Safe Area is important as trimming variance can occur. Not ALL printers will state their tolerance for trimming variance. This means you should always have your important artwork (such as text logos etc) a safe area with within the trim / artboard size. TIP: view our product pages ‘artwork’ tab, you will see the breakdown of sizes for bleed, trim and safe areas!
- Bleed: MUST be the same as stated in the product information or provided quote. Bleed is critical as trimming variance can occur. Bleed is essentially extending your not important artwork
(ie background graphics or photos) beyond the trim line. Generally most products have a 3mm required bleed (all edges). Larger format printing (banners etc may require 10mm bleed). For example a 90 x 55mm
business card should be exported with 3mm bleed. Outside the cropmarks (the lines that tell the guillotine where to cut) you should have 3mm extra artwork on each side. This means if you have a photo or
background that goes to the edge of the card, it needs to be 3mm further than the trim on each side. If the photo / background graphics fill the complete background the size should be 96 x 61mm.
Think of it this way. If you had a photo or background colour that went to the edge of the card, and there was 1mm trimming variance when the card was cut, you may be left with a 1mm while gap on the side of your card.
TIP: view our product pages ‘artwork’ tab, you will see the breakdown of sizes for bleed, trim and safe areas! We always recommend using our templates. - Colours: MUST be the same as stated in the product information or provided quote. Art is EITHER PMS or CMYK
RGB will require conversion (unless Laser Engraved promotional items).
Full colour CMYK cards May use PMS 871U Gold or 877U Silver
As most design these days is to be viewed on screen, it is easy to forget that printing requires artwork to be made with CMYK or Pantone colors – NOT RGB. RGB colors can be more vibrant (especially some greens and blues) so you may not be happy with the results when printed..
You can lean more about PANTONE here. - Fonts : All fonts must be converted to 'outlines', or 'curves'
- The exception to this is for magazines / booklets. In this case the fonts shoul dbe supplied as files (easily done when the file is 'packaged' from Indesign ). - Resolution : if NON VECTOR artwork is supplied, it must to be at least 300dpi or it will print pixelated. Vector artwork is ALWAYS recommended
- The exception to this is for magazines / booklets. - Pages: If more than 1 side, or print finishing is required: Supply on a multipage .pdf in a single file
page 1 = front print,
page 2 = back print,
The exception to this is if you require a flat sheet with a fold. See video:
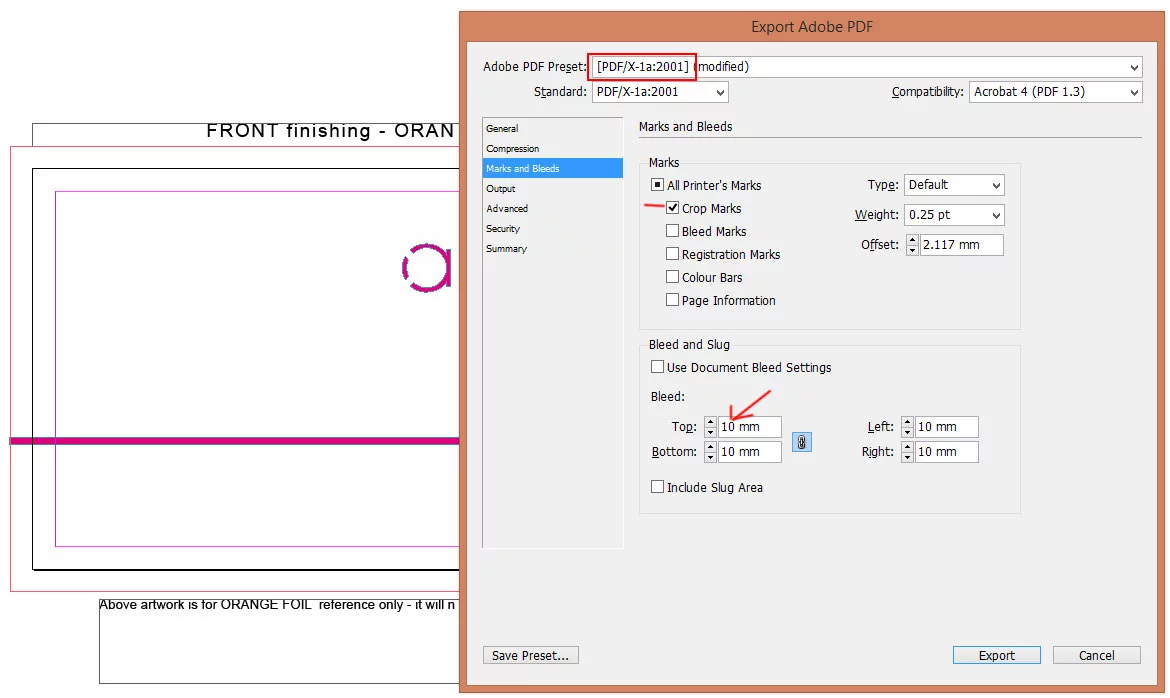
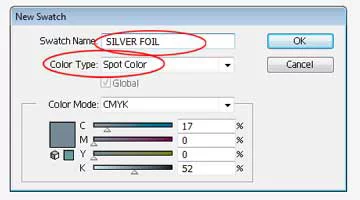
- Fold & Score : DO NOT Overlay the folding in the artwork. Mark 3mm OUTSIDE the trim (using a appropriately named SPOT COLOUR), and export with 10mm bleed.
- File Format: MUST be in PDF - using PDF-X1A to flattern any transparency etc.
- Crop Marks: Software created cropmarks included with 3mm bleed. Remember If you have printer notes, allow 10mm bleed. - Ensure your PDF file only has ONE
SET of cropmarks.
Borders in Artwork
Adding borders to artwork can be a dangerous design decision.
It is important to keep in mind possible trimming variance (see above notes on Safe Area and Bleed) . Essentially, think if the trimming was off 1mm on the left hand side, then the border would be 1mm less on the left hand side and 1mm larger on the right hand side. This would though out the aesthetics and could ruin the whole job.
How to combat this:
- Keep the border not over edge and offset into the safe area. Although this method won't fix possible trimming variance, it should be less noticeable.
- Keep the border/ line thickness larger. Smaller line border will be more noticeable if trimming variance occurs… especially if the border is ‘over trim’.
- Print a higher quantity and accept that more of the cards may be unusable.

This shows a design with a 2mm border (to edge of card)

This shows a the same design if there was 1mm trimming variabnce (off left side)

This shows a the same design if there was 1mm trimming variabnce (off left and bottom sides)
Pantone Printing
If the selected product requires Pantone Printing, the artwork needs to accommodate for it. See more about Pantone Management System (PMS) here
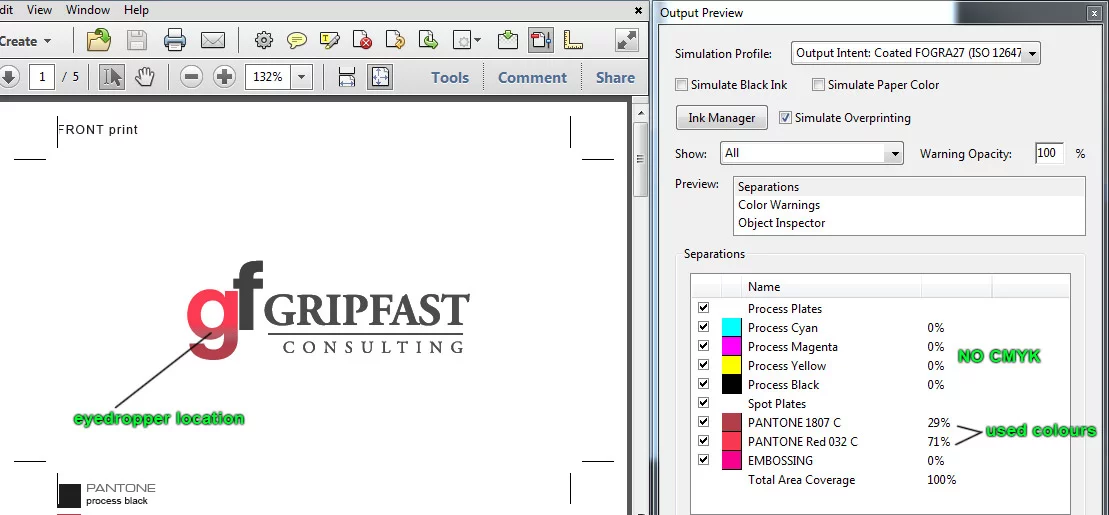
- SOLID UNCOATED: There are many different Pantone groups. We can only print SOLID UNCOATED range
- NO CMY : There should be NO Process colours (other than Black [K]) to make the artwork
The Following is INCORRECT for Pantone printing:

Print Finishing
If you project requires Spot UV, Raised UV, Foil Stamping, Embossing or Debossing or Die Cutting, the following is required
- Pages : Print Finishing must be supplied on a seperate page.
page 1 = front print,
page 2 = front finishing (IF RELEVANT),
page 3 = back print ,
page 4 = back finishing (IF RELEVANT)
- If more than one finishing option is required on one side an additional page is needed.
- If finishing option is NOT required, page is NOT needed.
- It is helpfull to name the page out side trim marks for reference.
- Artwork Type : artwork must be vector & set as an appropriately named spot colour (e.g. "Spot UV", “Black foil”, “Embossing” etc.)
Setting up Acrobat DC for Pre Press
The golden rule to check if your artwork is print ready is to use Acrobat PC. Acrobat DC is a professional program that comes apart of the Adobe suite.
If you do not have acrobat pro, chances are you cannot supply artwork print ready.
The following video will show you how to setup Acrobat PC for the most common tasks.
See video:
Check the PDF file in Acrobat DC
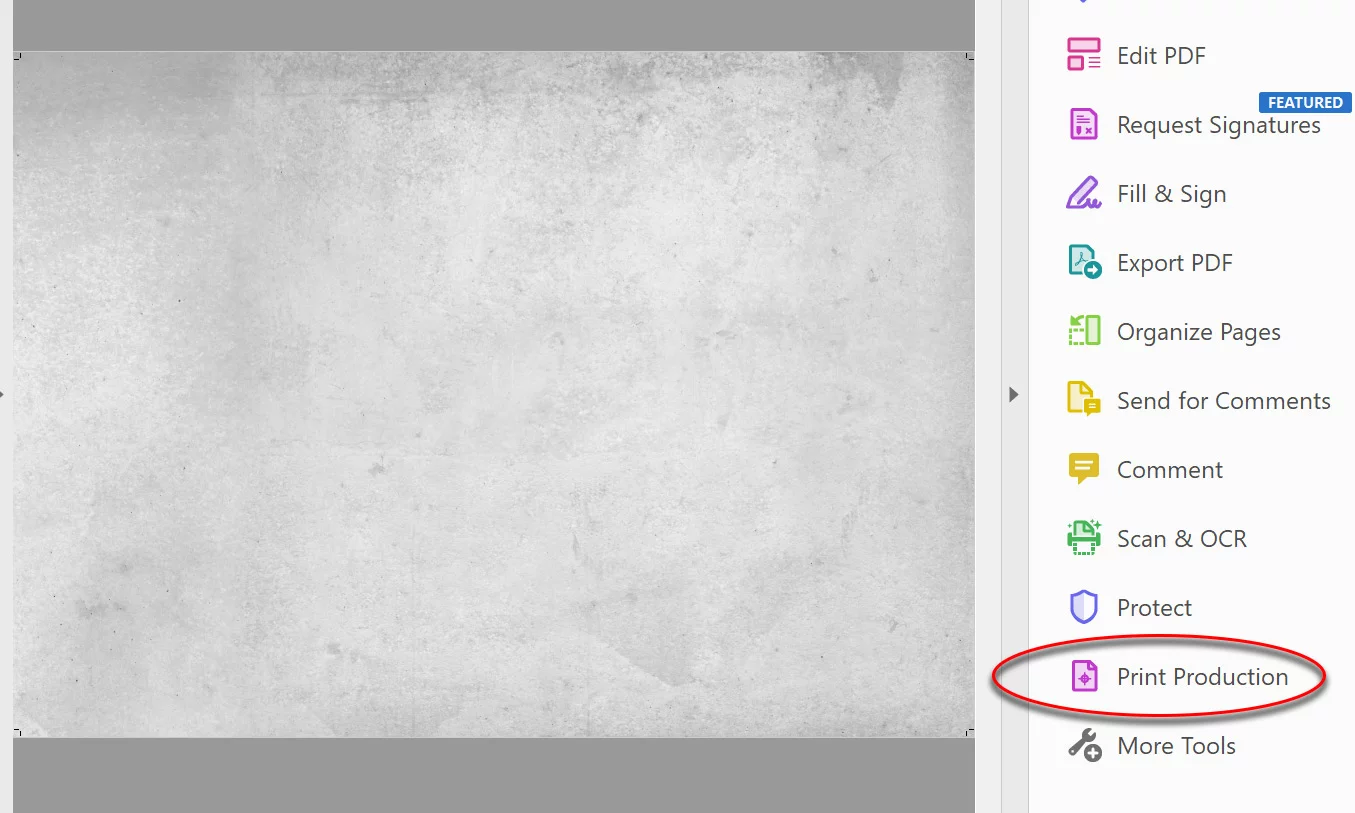
- Check for Correct Size : Check your TRIM area matches the product Specifiacations or what has been quoted. In Actobat DC, Ensure you Right Hand Panel has "Print Production".
If not, in the search panel, type "Print Production" > Right Click > Add shortcut.
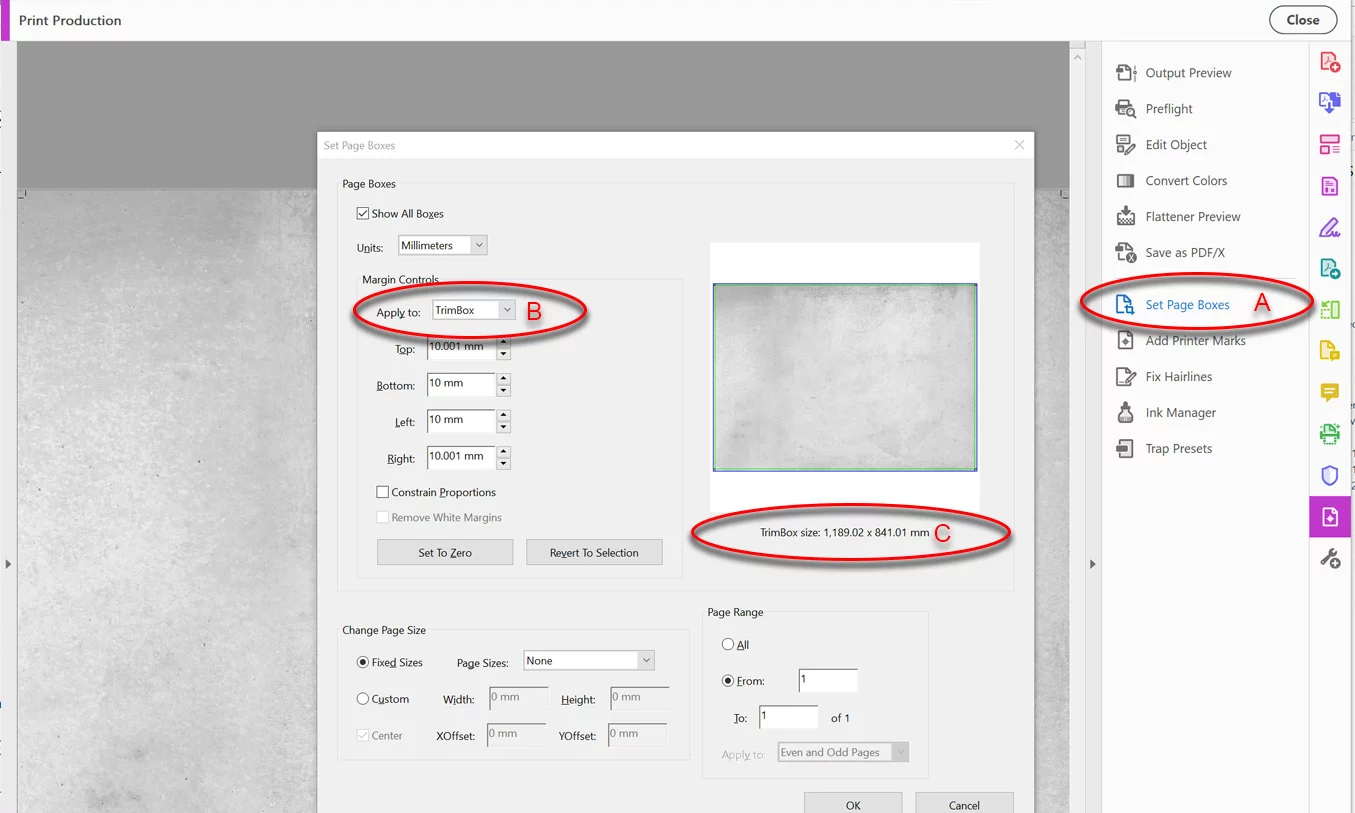
- a: click 'set page boxes'
- b: change Apply to 'Trimbox'
- c: view the 'TrimBox size'.
See video:
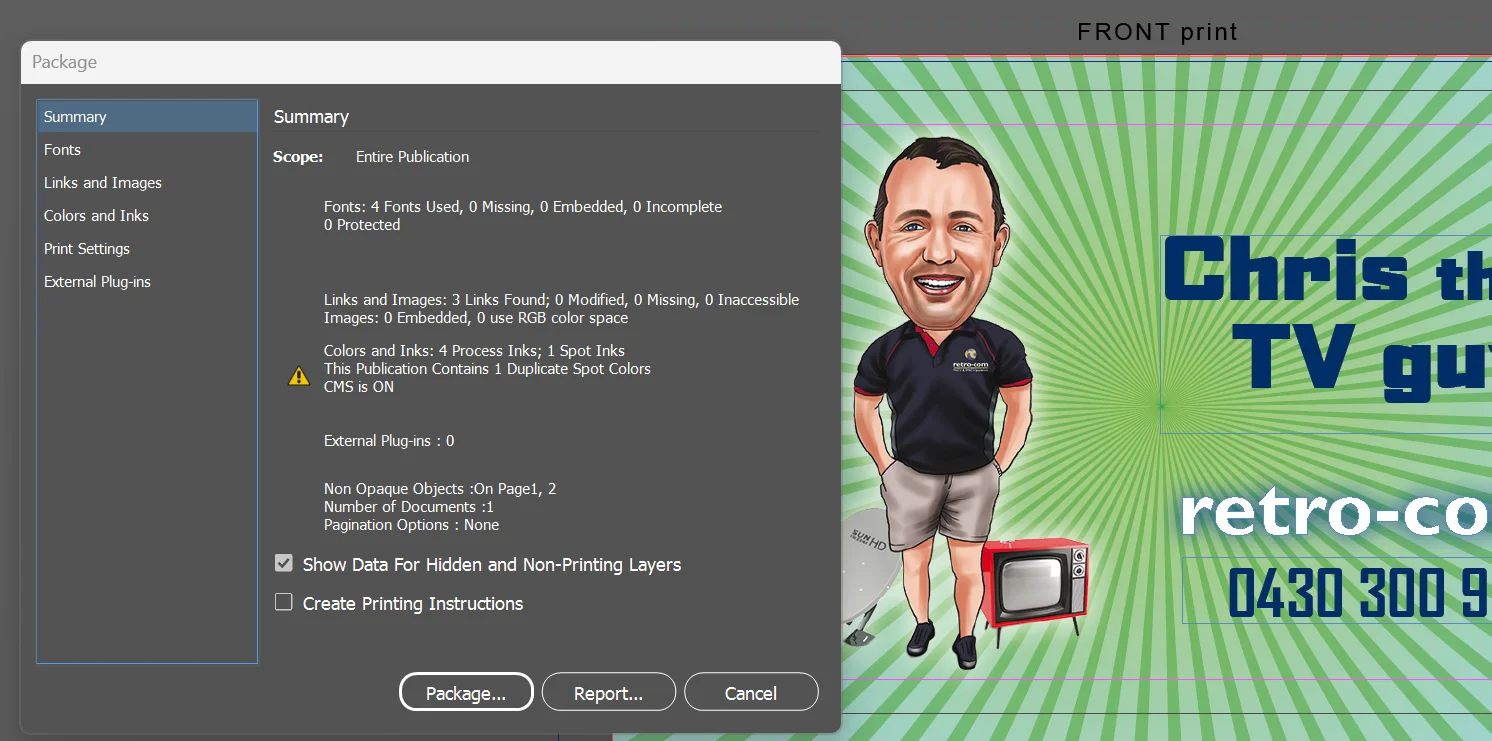
- Check for Embedded Fonts : Check your .PDF does not contain fonts.
File > Properties > Fonts Tab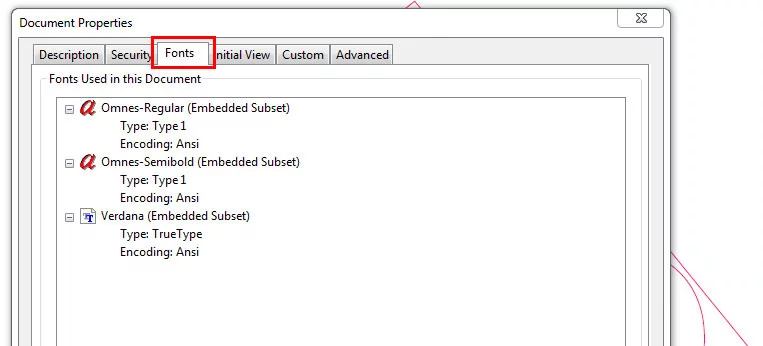
IF you see Fonts listed (as above image) then the file contains fonts and have not been converted to outlines. This means the file is NOT PRINT READY - The exception to this is for magazines / booklets.
See video:
- Check for Colours Used : Check your .PDF contain correct colour type.
Print Production > Output Preview
See video:
Send Packaged Indesign files
If you are wanting a quote for multipage documents (especially magazines / booklets), the first thing we do is check if the artwork is ‘print ready’.
If it’s not, it could be ‘how long is a piece of string’ to fix – IF – you do not supply the ‘working files’ .
By supplying these ‘working files’ , you may get off without us charging extra to make the job print ready.. it comes down to how much work is required. It may be as simple as exporting with crop marks and the right amount of bleed.. it may be that we have to adjust all images to they have 3mm bleed.. we won’t know until we see the working file.
Generally, professional designers and marketers use Adobe Indesign for multipage documents.
It is recommended if we say the artwork is not print ready, that you send a ‘packaged’ version of the InDesign file. Packaged (file > Package…) simply collects all the ‘assets’ including fonts, images etc, and zips them together with the Indesign file. Tis was, when we open it at out end, there are no missing resources.
Click here for instructions if the design was created in Canva.
Remember, the total number of page panels (pp) must be divisible by 4 (as a flat sheet folded in the middle creates 4 page panels).
Laser Engraving Artwork requirements
For best results, artwork needs to be supplied as:
- Must be vector artwork - If you only have PNG or JPG files, these type of file formats are pixel based and not editable and will need to be converted.
- Minimum artwork thickness = 0.17mm - If this requirements are not met, engraving may not show.
- Minimum gap inbetween artwork = 0.5mm - If this requirements are not met, engraving may join together.
- 100% black (no white or other colours)
- Solid only (convert stroke to outlines)
- All fonts must be converted to 'outlines', or 'curves' (or supply fonts)
- PDF format - using PDF-X1A to flatten any transparency etc.
- If you order has multiple kinds (artwork with different people / artwork). The job need to be supplied as separate files.
e.g. if the order is for 5 kinds, there should be 5 x PDF files supplied (note above file layout).
Print Promotion. We have been specialists in print finishing since 2009 and are happy to provide free consultation how to get the most
out your project. NO two jobs are the same, as no business is the same. As such each job should be treated with due process.
We offer first rate consultation to offer the right stock and the right finishing for your next upcoming job. The process is usually pretty quick once timeframe and budget is ascertained.
Further to this, we created this page to provide additional information regarding prepress – to ensure your artwork will turn out as intended. In addition, a comprehensive run down on all things print finishing – examples of how you can expect the product to turn out.
Who are we?
Print Promotion is a division of Arcane Media based in Brisbane, Queensland. We are a premium design and printing consultancy that specialises in creating or enhancing your visual corporate image. Our skilled team of seasoned graphic designers have the experience and marketing insight to ensure your image will effectively relate to your target demographic. We have an Australia-wide client base, servicing: hospitality and tourism; professional services; construction and trade; media; mining; recruitment; automotive; defence and the health business sectors.
Contact us today to discuss your next design or print project.
Call 1300 669 211
We design. We print. We deliver.
Chandler | Ascot | Burbank | Hamilton | Bulimba | Brookfield | St Lucia | Chelmer | Surfers Paradise | Paradise Point King | Seaforth | Malvern | Middle Cove | Castlecrag | Claremont | Swanbourne | Castle Cove | Roseville | Mosman Park | Balmain | Milsons Point | Kirribilli | Double Bay | Albert Park | Brighton | Berrimah | City Beach | Broadway Nedlands | Crawley | Dalkeith | Woollahra | Hunters Hill | Woolwich | Mosman | Dover Heights | Vaucluse | Hawksburn | Cottesloe | Peppermint Grove | Bellevue Hill | St Andrews | Darling Point | Edgecliff | Northbridge | Rindwood | Eltham | Greensborough | Camberwell | South Yarra | Byron Bay | Brunswick